hashcat使用注意事项
摘要:关于hashcat的使用的注意事项
测试hashcat是否安装正确
// linux下使用md5加密293258546829
root@iZ2ze2te6pm3iwftejxt16Z:~# echo -n 123456| openssl md5
(stdin)= e10adc3949ba59abbe56e057f20f883e

//使用hashcat进行破解
// -a 3 使用掩码模式进行爆破
// -m 0 指定加密类型为md5
// ?d?d?d?d?d?d 掩码类型
// --force  忽略警告
// --self-test-disable 忽略自检
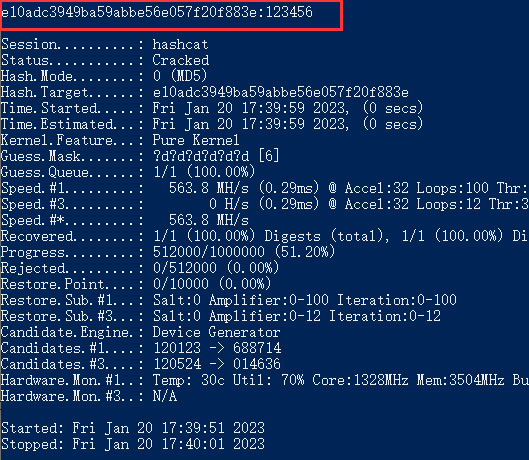
hashcat -a 3 -m 0 e10adc3949ba59abbe56e057f20f883e ?d?d?d?d?d?d --force --self-test-disable
出现图中字样代表hashcat运行正常。
查看hashcat命令帮助
查看hashcat命令的帮助手册
hashcat -h破解有特殊字符的密码
假如使用掩码破解2332'的密码,在Windows命令行下单引号需要使用\进行转义
// -a 3 使用掩码模式进行爆破
// -m 0 指定加密类型为md5
// -1 \'?d 表示1这个符号代表单引号和数字,同理也可以使用-2 ?d ,-3 ?d。
// ?1?1?1?1?1 掩码类型,表示密码有5位
// --force  忽略警告
// --self-test-disable 忽略自检
hashcat -a 3 -m 0 -1 \'?d 2ad141eb60729b53b7366a9774661c88 ?1?1?1?1?1 --force --self-test-disable
恢复之前的爆破进度
可以恢复因为死机、停电导致的爆破中断之前的进度
//如果您没有指定--session,则会使用默认名称"hashcat",即会在目录下创建 hashcat.restore文件,来存储爆破进度。
hashcat.exe --restore


//如果使用了--session 选项指定了session_name,比如下面的爆破例子
// -a 3 使用掩码模式进行爆破
// -m 0 指定加密类型为md5
// --increment --increment-min 1 --increment-max 12 表示密码的位数最小为1位,最大为12位
// ?1?1?1?1?1 掩码类型,位数需要和--increment-max保持一致
// --force  忽略警告
// --self-test-disable 忽略自检
hashcat.exe -a 3 -m 0 27bc4ff27daebabb01e8456ae2e7c083 --increment --increment-min 1 --increment-max 12 ?d?d?d?d?d?d?d?d?d?d?d?d --force --self-test-disable --session session_name

//若需要恢复之前进度,则需要使用 --session 选项指定 session_name
hashcat.exe --restore --session session_name
使用多个字典进行爆破
//使用hashcat进行破解
// -a 0 使用字典模式进行爆破
// -m 0 指定加密类型为md5
// test\* 为字典所在的目录
// --force  忽略警告
// --self-test-disable 忽略自检
hashcat -a 0 -m 0 e10adc3949ba59abbe56e057f20f883e test\* --force --self-test-disable

或者

hashcat -a 0 -m 0 e10adc3949ba59abbe56e057f20f883e 字典1.txt 字典2.txt 字典3.txt --force --self-test-disable
使用规则进行爆破
可以利用规则对字典进行变换,从而进行爆破,详见 Hashcat教程:利用“规则”破解密码
//使用hashcat进行破解
// -a 0 使用字典模式进行爆破
// -m 0 指定加密类型为md5
// -r ./test.rule 规则所在的文件
// ./dict.txt 字典
// --force  忽略警告
// --self-test-disable 忽略自检
// 38008dd81c2f4d7985ecf6e0ce8af1d1 为Sping的md5加密hash
hashcat -a 0 -m 0 38008dd81c2f4d7985ecf6e0ce8af1d1 -r ./test.rule ./dict.txt --force --self-test-disable
test.rule的内容如下
c规则将单词的第一个字母大写,其余字母小写,因此spring应该成为Spring
cdict.txt的内容如下
springhashcat最优化命令
hashcat的几个调优参数
hashcat.exe -a 3 -m 0  -o result.txt a69c7d393e70fe3785dfa93e43886c19 --increment --increment-min 12 --increment-max 12 ?d?d?d?d?d?d?d?d?d?d?d?d  --self-test-disable  --workload-profile 4 --segment-size 512 --optimized-kernel-enable --force --potfile-disable

参数解释:

-o result.txt
将结果保存到result.txt中

--workload-profile (ps:使用这个选项会大量占用内存,不知道为啥)
Enable a specific workload profile, see pool below
  # | Performance | Runtime | Power Consumption | Desktop Impact
 ===+=============+=========+===================+=================
  1 | Low         |   2 ms  | Low               | Minimal
  2 | Default     |  12 ms  | Economic          | Noticeable
  3 | High        |  96 ms  | High              | Unresponsive
  4 | Nightmare   | 480 ms  | Insane            | Headless


--segment-size
Sets size in MB to cache from the wordfile to X

--optimized-kernel-enable
Enable optimized kernels (limits password length) 这个能使破解时间成倍的减少。

--force
Ignore warnings

网传的 --gpu-accel 和 --gpu-loops 已经被 --kernel-accel 和 --kernel-loops 代替。这两个参数不用指定了。改为指定--workload-profile参数即可
详情参见:https://hashcat.net/forum/thread-5184.html.

--potfile-disable
Do not write potfile

--self-test-disable
Disable self-test functionality on startup
有的时候会爆下面这个错误(比如 hashcat -m 1000 -a 3 f9e37e83b83c47a93c2f09f66408631b ?l?l?l?d?d?d --force),需要使用--self-test-disable选项
Your device driver installation is probably broken.
See also: https://hashcat.net/faq/wrongdriver
Aborting session due to kernel self-test failure.
You can use --self-test-disable to override, but do not report related errors.
本作品采用 知识共享署名-相同方式共享 4.0 国际许可协议 进行许可。